My Blinkie

Registered with TWInc

About Me
- Simone aka Lorraine
- Hi everyone! I'm a 52 year old scrap and Paint Shop Pro addict. I've been PSPing since 2004. I love creating and I love sharing. Programs I use: Paint Shop Pro 10 Particle Illusion 3.0 Animation Shop 3.0 CS3 PS 7
Saturday, April 13, 2013

♥♥♥
Please click on TAG to see in full size.
••• Supplies needed to complete this tutorial. •••
____________________________________________________________________________
••• Supplies needed to complete this tutorial. •••
____________________________________________________________________________
Programs: Paint Shop Pro, I'm using version 10. Animation Shop 3.
Plugin : Eye Candy 4000 : gradient glow, dbs flux : bright noise, VM Natural : Sparkle
Font used: A&S Motherload
Tube of choice: I'm using the beautiful tube Nina by Lady Mishka which can only be found at SATC
To use the same tube I did you need to add the tube to your cart and spend just $10.00 to get it as a free gift.
Scrap Kit : "Amanda" by Bibi's Collection
Mask: by me (Mask98) download HERE
______________________________________________________________________________
♥♥♥
Save your tag often. Nothing like working long and hard on a tag and PSP crashes.
♥♥♥
I used Mask98SophisticatSimone on paper 3. I had to duplicate 4 time to get it to the opacity I liked. I also added noise to 30 on it.
Go to File, New Image, 700 x 700. Add the paper you just used your mask on.
C/P element 106 (window frame) as a new layer onto your canvas. Close original.
C/P element 091 (horse) as a new layer onto your canvas. Close original. Re-size by 60%, 72 dpi.
C/P element 032 (buckets with tap water) as a new layer onto your canvas. Close original. Re-size by 80%, 72 dpi.
C/P element 076 (large rock) as a new layer onto your canvas. Close original. Re-size by 80%, 72 dpi.
C/P element 090 (pink cap mushrooms) as a new layer onto your canvas. Close original. Re-size by 46%, 72 dpi.
C/P element 092 (pink foliage) as a new layer onto your canvas. Close original. Re-size by 25%, 72 dpi.
Cluster your mushrooms and foliage on the right hand side of the pond.
C/P element 002 (green foliage) as a new layer onto your canvas. Close original. Re-size by 25%, 72 dpi.
C/P element 109 (bouquet of flowers) as a new layer onto your canvas. Close original. Re-size by 25%, 72 dpi. Add to your mushroom and foliage cluster on the right side of pond.
C/P element 093 (purple hill) as a new layer onto your canvas. Close original. Position behind the fountain and the water pond.
Duplicate and re-size by 40% and position in front of pond.
C/P a few the rocks and re-size them differently and just scatter them around the pond.
Ok now we are going to promote a portion of the rock that's a part of the pond.
Grab your selection tool, set to Freehand selection, point to point, add (shift), feather 0, smoothing 0, anti-alias checked.
Zoom in a lot on the area and reduce opacity on any layer that is above that rock, so you can see it well.
Click around the rock, very close to edge. Once you get back to the start point, right click to join the ends.
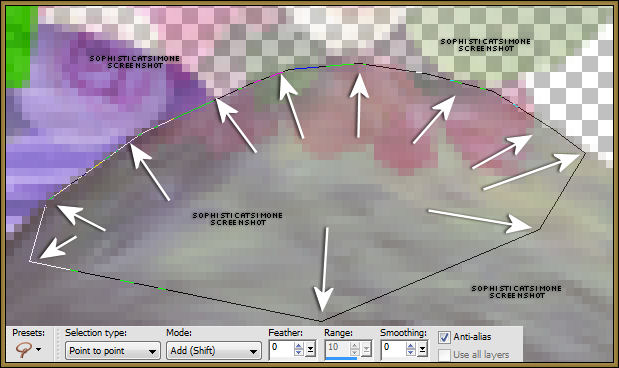
On your pond layer in layers palette, right click and promote selection to layer. Move this layer above any foliage or flower you have on the edge of the pond. De-select.
C/P element 095 (pink tree) as a new layer onto your canvas. Close original. Re-size by 80%, 72 dpi. Re-size again by 80%.
Move to the back behind the fountain and in front of purple hill.
C/P element 045 (branch with dragonflies) as a new layer onto your canvas. Close original. Move over window frame at the bottom edge.
C/P element 046 (flowers) as a new layer onto your canvas. Close original. Re-size by 31%. Move to the bottom edge of the pond.
C/P element 108 (pink flower) as a new layer onto your canvas. Close original. Re-size by 31%. Move to left hand side of tag. If you placed rocks in front of the purple hill, just place the flower on top to them.
C/P element 098 (berries on foliage) as a new layer onto your canvas. Close original. Re-size by 36%. Move this layer between your
fountain layer and your pond layer. Position near the right side edge of pond.
OK now what you need to do is just add a bunch of little flowers, branches, leaves, etc. Rotate them, mirror them, flip them, etc.
Remember to add drop shadows to all your layers.
Be creative and make this your own.
The rabbit is a tube that comes with the special commission by Lady Mishka. You can get this tube at SATC when you make a purchase of $10 or more. You just add it to your basket and you can download right away.
Select the inside of your window frame and add paper of choice. Delete extra.
Now paste your tube of choice and position where you would like. Delete extra.
Add drop shadow.
Add copyright info and scrap kit credit.
You can save this as a png or you can move on to the animation part.You will need your lasso tool, set to point to point, Mode:
Add(shift), feather of 0 and smoothing of 0. Anti-alias checked.
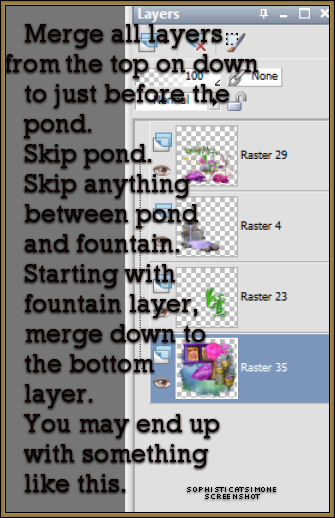
You will need to x-out all layers in front of your pond and fountain just to be able to see. What I did is, starting with your top layer,
right click on it in the layers palette and merge down. Keep merging down till you get to the pond. Then you can x-out that layer.
On your pond layer, select all the water. You will need to zoom in and click nice and close to the edges. Try your best not to include any of the grey rock. Do quick and short clicks. Once your finished with the pond, select your fountain in the layers palette and do the same.

OK so now you will need to add the effect/plugin filter to each of these layers.
You will be doing a lot of back and forth because you're applying two different filters to two different layers.
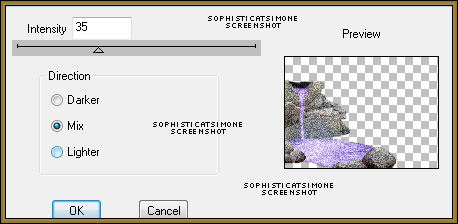
So go to Effects, plugins, dsb flux, bright noise, Intensity 35, Mix checked.
In layers palette activate the next layer. It should be your pond, but not a big deal if it's the opposite.
Apply the same settings.
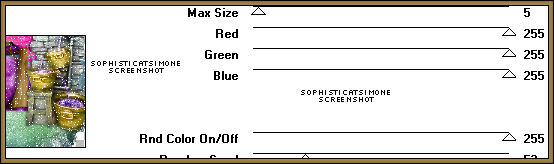
Now go to Effects, plugins, VM Nature, Sparkle.
Enter Max Size 5-10 (always)
All other settings leave at 255 except the Random Seed is 52.
Click OK, repeat again on the same layer and change random seed to 62.
In layers Palette activate the next layer and do the same thing.
Un-hide all layers.
Go to Selections, Select All.
Go to Edit, Copy Merged.
Paste as a new animation in Animation Shop.
Back in PSP, go to Edit, and Undo until you get through the Sparkle effect and the noise effect.
Repeat the steps.
When applying the dsb flux noise, just click twice on the checked MAX, it will scramble the noise.
When applying the sparkle effect, change the random seed to 55 and 65 (because you're doing it twice remember).
Go to Selections, select all, unhide all and copy merged.
In AS, right click on the current frame and paste, paste behind current frame.
Back in PSP, undo all effects (sparkle and noise).
Now repeat again.
Make sure you always do the noise effect before you do the sparkle effect otherwise you won't see the sparkle.
Go back in AS and on the last frame, (you may need to move the slider bar at bottom of animation), right click and paste after
current frame. Now you have 3 frames. Play. If you are happy with the effect, save your tag.
Add name. I used Paper 19 as background fill for the name.
Font : A&S Motherlode
Size : 120
Add gradient glow and drop shadow.
Add to your tag in AS.
Save your tag.
Hope you enjoyed this tutorial,
Hugs Simone
Please, always direct people to my blog to download my animations.
Do not load to any other download site and don't claim as your own.
Tutorial written by SophisticatSimone aka Lorraine Halle on Saturday, April 13, 2013.
Hugs Simone
Please, always direct people to my blog to download my animations.
Do not load to any other download site and don't claim as your own.
Tutorial written by SophisticatSimone aka Lorraine Halle on Saturday, April 13, 2013.
Subscribe to:
Post Comments
(Atom)
0 comments:
Post a Comment