My Blinkie

Registered with TWInc

About Me
- Simone aka Lorraine
- Hi everyone! I'm a 52 year old scrap and Paint Shop Pro addict. I've been PSPing since 2004. I love creating and I love sharing. Programs I use: Paint Shop Pro 10 Particle Illusion 3.0 Animation Shop 3.0 CS3 PS 7
Friday, March 22, 2013

Please click on TAG to see in full size.
Supplies needed to complete this tutorial.
Supplies needed to complete this tutorial.
Programs: Paint Shop Pro, I'm using version 10
Animation Shop 3
Plugin : Eye Candy 4: Gradient Glow for Name.
Font used: Valentine
Tube of choice, I'm using tube "Chloe"by Zlata M from SATC
Scrap Kit "BALLERINA FAIRY" by Bibi's Collection at SATC
Scrap Kit "BALLERINA FAIRY" by Bibi's Collection at SATC
My Animations: Bubbles and Glitter/Bling: HERE
Mask: Mask 89 SophisticatSimone HERE
Save your tag often. Nothing like working long and hard on a tag and PSP crashes.
File, New Image, Width=700, Height=600
Open paper(1). C/P as a new layer on your canvas.
Using your Mover Tool position paper where you like it.
Click on your Crop Tool and select Merged Opaque, apply.
Open Mask 89SophisticatSimone.
Go to Layers, New Mask Layer, From Image.
In source window find the Mask.
Create mask from : source luminance and make sure Invert mask data is UN-checked.
In layers Palette, right click on layer and merge group.
•
Open element(89) sparkles. C/P as a new layer. Make sure it's on top of Mask layer.
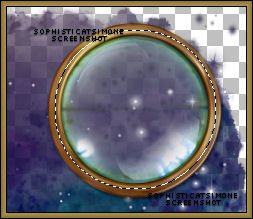
Open element(104) circular window. C/P as a new layer. Re-size by 60%. Position in upper right hand side.
Activate your selection tool, set to Ellipse, feather=0 and starting at center of element 104 drag out a circle that goes half way past the gold edge.
Open paper(1). C/P as a new layer on your canvas.
Using your Mover Tool position paper where you like it.
Click on your Crop Tool and select Merged Opaque, apply.
Open Mask 89SophisticatSimone.
Go to Layers, New Mask Layer, From Image.
In source window find the Mask.
Create mask from : source luminance and make sure Invert mask data is UN-checked.
In layers Palette, right click on layer and merge group.
•
Open element(89) sparkles. C/P as a new layer. Make sure it's on top of Mask layer.
Open element(104) circular window. C/P as a new layer. Re-size by 60%. Position in upper right hand side.
Activate your selection tool, set to Ellipse, feather=0 and starting at center of element 104 drag out a circle that goes half way past the gold edge.
Copy and paste a close up of your tube. Invert selection and delete extra.
Selection none.
Duplicate your close up. Bottom layer has a blur of 3
Top close up layer is set to Soft Light.
Add drop shadow to element 104.
Shadow I use:
V=3 H=2 Opacity=73 Blur=7.25 Color=black.
•
Copy and paste your tube and add drop shadow.
Open element(98) Large stone.C/P as a new layer. Position to lower left hand side of tag. Add DS. Make sure it's behind your tube layer.
Copy and paste your tube and add drop shadow.
Open element(98) Large stone.C/P as a new layer. Position to lower left hand side of tag. Add DS. Make sure it's behind your tube layer.
•
Open element(80) Stone steps. C/P as a new layer. Position so the stone steps start on the lower edge of circle window. Select your selection tool, set to Point to point, feather 0, and remove extra step that is at bottom edge of tag. Add DS.
•
Select your crop tool, and select Merged Opaque, apply.
•
Open element(47) Water Fountain. C/P as a new layer. Re-size by 55%. Position to lower right hand side of tag.
Shadow I use:
V=-2 H=-4 Opacity=57 Blur=7.25 Color=black.
•
Open element(107) Bottled fish. C/P as a new layer. Re-size by 55%. Position bottom of tag, near your tube. See my tag for reference.
Shadow I use:
V=3 H=2 Opacity=57 Blur=7.25 Color=black.
•
Open element(113) Large mushrooms. C/P as a new layer. Re-size by 55%. Position behind your tube between the stone step layer and the circle frame layer.
Shadow I use:
V=3 H=2 Opacity=67 Blur=9 Color=black.
•
Open element(28) Tree branch with flowers. C/P as a new layer. Re-size by 55%. Position behind your tube at top of tag. Overlap the circle frame a little. Duplicate layer, mirror. Go to Image, Free Rotate, right, 90 degrees, All layers UN-checked. Position on circle frame to the right, behind water fountain layer.
Shadow I use:
V=2 H=1 Opacity=67 Blur=5 Color=black.
Merge those two layers. (Merge down).
•
Open element(114) mushrooms. C/P as a new layer. Re-size by 55%. Position in front of your tube layer.
Duplicate and merge down. Duplicate and mirror.
•
Let's re-size our canvas.
Go to Image, Canvas Size, change dimensions to W=700, H=780
Shadow I use on those mushrooms:
V=2 H=1 Opacity=67 Blur=5 Color=black.
Merge those two layers. (Merge down).
•
Open element(105) Circle water feature. C/P as a new layer. Position in front of your tube layer and behind mushrooms layer.
Shadow I use:
V=2 H=1 Opacity=67 Blur=5 Color=black.
Merge those two layers. (Merge down).
•
Open element(93) Blowing flowers. C/P as a new layer. Position in front of your tube layer. This should be your top layer now. Re-size by 80%.
Shadow I use:
V=11 H=14 Opacity=34 Blur=13.04 Color=black.
Duplicate layer.
Merge those two layers. (Merge down).
•
Open element(70) Flower. C/P as a new layer. Position on top of your circle frame.
Shadow I use:
V=6 H=0 Opacity=50 Blur=13.04 Color=black.
•
Open element(106) fish. C/P as a new layer. Re-size by 55%. Position behind the circular water element at bottom of frame.
Shadow I use:
V=-8 H=-30 Opacity=66 Blur=21.74 Color=black.
•
Go to Selections, Select all.
Go to Edit/ Copy Merged.
•
Go to Animation Shop and right click paste as a new animation.
Hold Ctrl key down and tap letter "L" until you have 11 frames.
Go to Edit, Select All.
Go to Edit, Select Propagate Paste.
Open SimoneAni352-blitzblingsmall.
Go to Edit, Select All.
Go to Edit, Copy.
Activate your tag.
Go to Edit, Paste, Paste into selected frames.
Place over the lantern your tube is holding. If you've used another tube, then you may wish to place this animation elsewhere. I also pasted it over the bottle containing the fish.
•
Open SimoneAni353-blitzbling. Go to Edit, select all.
Go to Edit, Copy.
Activate your tag. Go to Edit/Paste into selected frames.
I positioned this animation at the bottom of tag closer to the left.
Now activate that same animation (353) and go to View/ Mirror.
Go to Edit, select all.
Go to Edit, Copy.
•
Activate your tag. Go to Edit/Paste into selected frames.
Position at bottom and to the right of tag.
•
Let's open the bubbles animation.
I used the larger one, SimoneAni354-bubblesLarge.
Select All/Copy.
On your tag, Paste. I position near the fish's mouth.
Play your animation. If you like it you can now add your name and save your tag.
Make sure you've added artist copyright and your license number. You can also give credit for the scrap kit.
Select your crop tool. Select Options, choose surround the opaque area.
Double click your tag.
You can now save it either with transparent background or add a white background.
To add bg, go to Animation: Animation Properties, select Opaque and change color to white.
Hope you enjoyed this tutorial,
Hugs Simone
Please, always direct people to my blog to download my animations.
Do not load to any other download site and don't claim as your own.
Tutorial written by SophisticatSimone aka Lorraine Halle on Sunday, March 21, 2013.
Enjoy!
Subscribe to:
Post Comments
(Atom)
0 comments:
Post a Comment